How to change font style in Windows 10 Notepad
Learn how to change font style in Windows easily in just a few steps. This guide will walk you through finding the perfect font and applying it to your Windows machine.
Windows Notepad is one of the most needed tools in our daily lives. This is mandatory for every user to keep writing simple content. So sometimes we need to increase the font size or change the font in Notepad. Changing the font style in Windows 10 Notepad is a straightforward process that allows you to personalize your text editing experience.
Notepad is a simple and lightweight text editor that comes pre-installed with Windows 10, and while it doesn’t offer an extensive range of formatting options, you can still customize the font style.
That’s why I’m trying to write an article about this. In this article, I’m going to show you how to style the font in Windows 10 Notepad. This is a very simple step to do. You will find a lot of blogs about this, but you can not find a very simple and easy way like mine.
Exploration of WordPress themes for authors will delve into the diverse array of options available, highlighting the key features that empower authors to curate a compelling online presence.
How to change font style in Windows?
Here’s a brief guide on how to change font style in Windows 10 Notepad:
Step 1:
Open the notepad: Double-click the Notepad icon on your desktop or search for it in the Start menu.
Step 2:
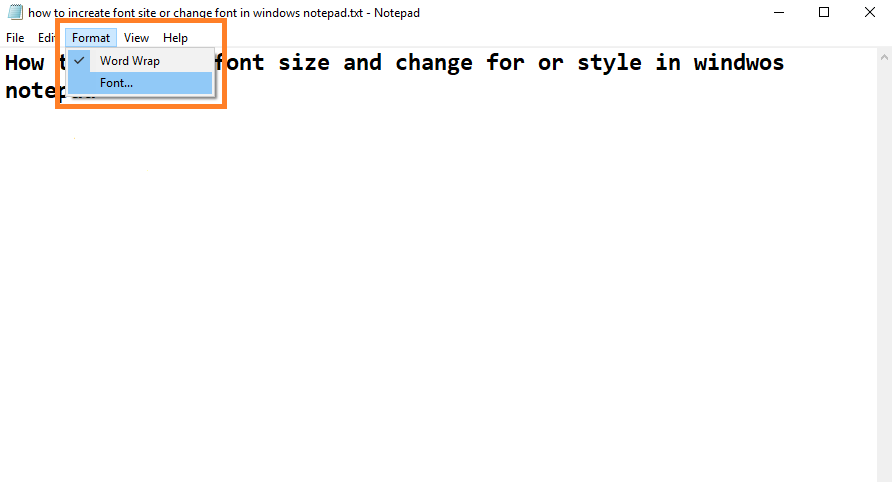
Go to Font Settings: Click on the “Format” menu at the top. Then, select “Font” from the dropdown menu.
Step 3:
Choose your Font: A new window will appear showing different font options. Click on the “Font” list and choose the style you like, such as Arial, Calibri, or Times New Roman.
Step 4:
Adjust Font Size (Optional): You can also change the font size in the “Size” section. Click on the up or down arrow to select your preferred size.
Step 5:
See a Preview (Optional): The “Sample” box below will show you how the text looks with your chosen font and size.
Step 6:
Save the Change: Click “OK” to apply the changes. The text in your Notepad document will now be displayed in your chosen font style and size.
If you are having any problems, you can see this short video for easier
Important Notes: How to change font style in Windows
- This method changes the default font system-wide. Not all applications may support the new font.
- Editing the registry can be risky if done incorrectly. Be sure to follow the steps carefully and create a backup of your registry before making any changes.
- There is no built-in way to revert this change in Windows 10 settings. If you don’t like the new font, you’ll need to create another registry file to set the font back to the default or another font of your choice.
For Windows 11, there is currently no direct way to change the default system font through settings. You can still achieve this by editing the registry, but the process is slightly different. If you’re using Windows 11, it’s recommended to search online for specific instructions related to that version.
Conclusions
If you’re looking to change the font style within an individual program, you’ll need to consult the program’s documentation or search online for specific instructions. Most programs have a menu or settings option where you can change the font style, size, and color.
You can easily change the font style in Windows 10 Notepad by following these steps. Keep in mind that Notepad’s formatting options are relatively basic compared to more advanced text editors, but they serve simple text editing tasks well.