
How to Install a WordPress Plugin
To install a WordPress plugin, navigate to your WordPress dashboard, click ‘Plugins’, then ‘Add New’, and search for the plugin’s name. After finding your desired plugin, click ‘Install Now’, followed by ‘Activate’.
Plugins are integral to expanding the functionality of your WordPress website. From enhancing SEO to adding social sharing buttons, plugins offer a myriad of features to elevate your site’s capabilities and user experience.
Before diving into the vast sea of options, it’s pivotal to ensure that your WordPress theme is compatible with the plugins you’re eyeing.
This preparation safeguards against potential conflicts and preserves website performance. Selecting the right plugin involves a mix of assessing user reviews, update frequency, and developer support.
Remember, a well-chosen plugin not only adds desired features but also maintains the agility and security of your site.
If you want your website security and recovery choose Backup WordPress Plugin safeguards.
Choosing The Right Plugin For Your WordPress Site
Choosing the right WordPress plugin demands a clear understanding of your website’s needs. Think about the features you require to achieve your site’s goals. Is it SEO optimization? Security enhancement? Or perhaps social media integration?
Once you have listed your requirements, the time to evaluate plugin reviews and ratings comes next. High-quality plugins usually have a large number of positive reviews and high ratings. Reviews reveal real user experiences, helping you gauge a plugin’s performance.
Remember, consistency in updates and trustworthy developers is key. A plugin with regular updates implies ongoing improvements and security fixes. Checking the plugin’s active support threads is also wise. It suggests the responsiveness of the developers to user issues.

Credit: www.hostinger.com
Pre-installation Checklist of Install a WordPress Plugin
Before installing a WordPress plugin, confirm the plugin’s compatibility with your version of WordPress. Visit the plugin’s download page. Look for information about which versions it supports. Ensuring compatibility prevents issues with your website’s functionality.
Always back up your website before adding new plugins. This step is crucial. It protects your data against any potential errors during installation.
You can use a plugin to create backups. Alternatively, your hosting provider may offer backup solutions. Be sure to check their offerings. Regular backups save time and stress if recovery becomes necessary.
Installing A Plugin Via WordPress Dashboard
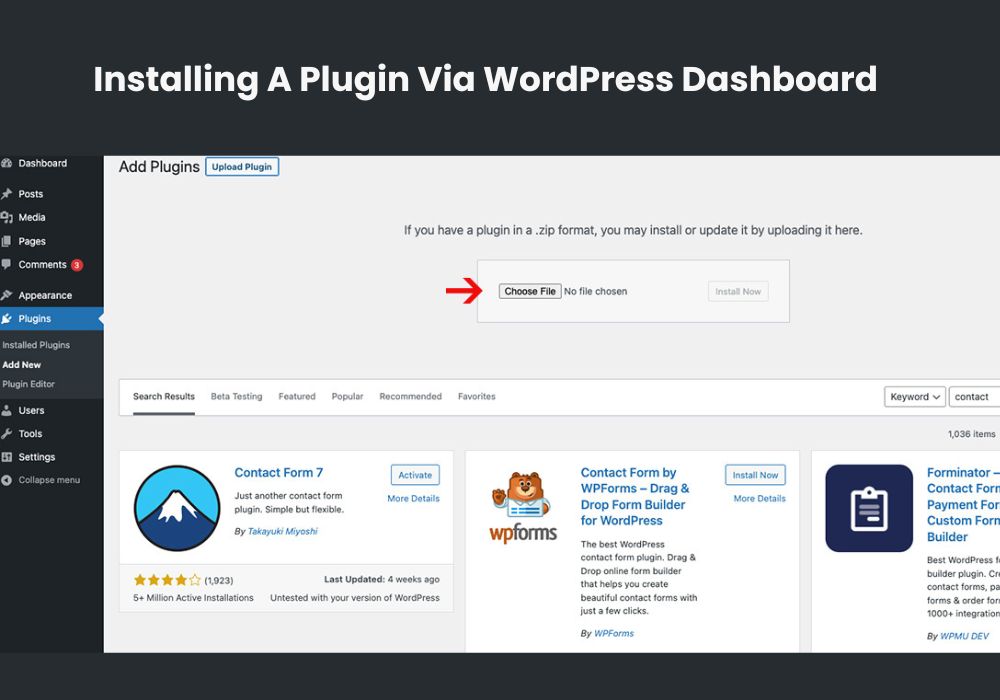
To begin installing a plugin via the WordPress dashboard:
- First, log in to your WordPress admin panel.
- Navigate to the Plugins section on the left menu.
- Click the ‘Add New’ button at the top of the page.
- Here, you will find a search bar.
- Type the name of the plugin you desire.
- As results pop up, read through details about each plugin.
- Make sure to check ratings, reviews, and compatibility.
- Choose the right one for your needs and click ‘Install Now’.
Wait for the installation process to complete. Then, click ‘Activate’ to use the plugin on your site. It’s as simple as that!
Manual Install a WordPress Plugin Via FTP

To start the manual installation of a WordPress plugin, first download the plugin’s zip file. Visit the plugin’s page on the WordPress.org repository or the developer’s website. Look for a download button or link, and save the file to your computer.
Next, extract the zip file if it doesn’t automatically unzip. Now, open your FTP client like FileZilla. Use your hosting credentials to connect to your website. Navigate to the ‘wp-content/plugins’ directory. Here, upload the plugin folder from your computer.
Finally, go to your WordPress dashboard. Click on ‘Plugins’ and find the newly uploaded plugin. Click ‘Activate’ to start using the plugin on your site. Check the plugin’s settings to ensure it’s set up correctly.
Setting Up and Installing a WordPress Plugin
To set up a WordPress plugin, navigate to your dashboard. Find the ‘Plugins’ section. Click on ‘Add New’ to search for the plugin you require. After installation, click ‘Activate’. Then, locate the plugin settings. Usually, these are under ‘Settings’ or the plugin’s tab.
Configuring options is vital for proper functioning. Various plugins have different settings. Some common options include: setting permissions, choosing design elements, or integrating with other tools. Read the documentation provided. It helps a lot. Make sure to save changes after you adjust settings.
Troubleshooting Common Installation Issues of Installing a WordPress Plugin
Failed plugin installations can arise due to various factors. Check your WordPress version and plugin compatibility first. A common cause is plugin file corruption during download. Attempt to re-download the plugin and install it again.
If the problem persists, review your web server’s error log; it may reveal specific installation issues. Sometimes, permission settings on your WordPress directories can prevent successful installations. Ensure the write permissions are correctly set.
Plugin conflicts can disrupt your site. To resolve conflicts, start by deactivating all plugins. Then, reactivate them one by one, checking for the issue after each. When you find a conflicting plugin, look for an alternative or contact the plugin developer for help.
Conclusion
Wrapping up and installing a WordPress plugin is a breeze with the right steps. Success hinges on selecting the appropriate tool and following the installation guide meticulously.
Remember, keeping your site’s plugins up-to-date ensures optimal performance and security. Now, with your new plugin installed, you’re set to enhance your website’s functionality.
Embrace the change and watch your site thrive.


